Photography Tip: Free Photo Editing Software – Part 2
This week on my free photo editing software tip, I thought I’d take a look at the free site Photoshop.com, which is Adobe’s attempt at a free photography management and editing tool. You can access the website from anywhere that you have internet access, making it conveniently portable. You do have to sign up for an account with the site but the sign up process is pretty quick and painless.
After getting set up, you will find the upload tool on the My Library screen. Here is where you would upload the images you would like to edit. When you get your image pulled up, below you will find the “Edit” tab. There are 3 Categories of Edit tools: Basic, Adjustments, and Advanced. Just like with Picasa, the Advanced tools are used to make more flashy/artistic edits.
The Basic category will do for most edits one will need. Here you will find the Crop/Straighten tool, the Auto correction tool, and the exposure tool, among other options. The Adjustments include Highlight, Fill Light and the Sharpen tools.
The cool thing about this site is that for most edit options that you select, the site presents you with multiple versions of the edit, typically 5 or 6. This is an interesting concept because it allows for subjectivity. Some people tend to like images cooler (more blue) and others prefer warmer (more red/yellow-ish).
- The crop and resizing tool worked easily. The Crop tool was nice, in that, there was no restriction on the give and take of cropping out parts of the image. Some tools that have a crop option only allow you to crop so much of the photo.
- The “auto-correct” can also be useful. It does most of the work for you.
- The Exposure button is pretty nifty. It acts like the exposure dial on your camera. Plus, the site offers you 6 exposure options; three of the exposure are darker and three are lighter than the original.
- There is also a resize tool that offers some template sizes or allows you to custom size the photograph. This comes in handy when you need to size your photos to put up on the web, which there is a template selection for website sized photos.
- The Highlights and Fill Light can brighten up some of your darker exposures. Be careful not to go overboar
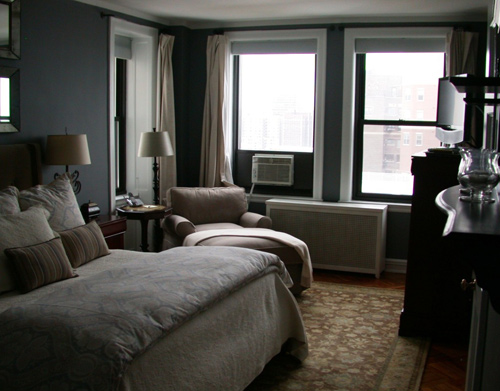
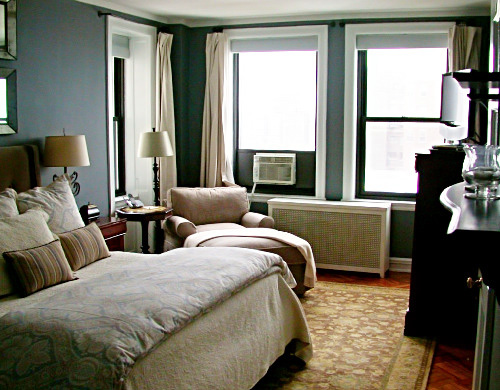
Here are two photographs, from a DIYer, that I edited using Photohop.com.
 This is the original. It appears dark and look at those dust spots.
 TaDa! The kitchen is now ready to be cooked in!
 You can barely see this beautiful bedroom.

Voila! Now you can see.
There is one thing I failed to mention that I think is my favorite option on the site. The “View Original” button allows you to go back to your original image and compare that to what you have edited thus far. At any point you click that button it will flash the original photo, letting you see what great work you have done!
Overall, for free software, Adobe did well. It’s definitely no Photoshop. It is nice that this tool is online. The photos are available for access anywhere (you have internet access) at anytime. The downside to being online is that it’s a little slower than a desktop app would be since it’s not hosted on your machine; therefore performance is based on your internet connection.
Check out Photoshop.com and tell me what you think.


